1. Logging into Portal
- Login to client portal with the link: Login
- Username and password will be provided by us.

- Once logged in, you will see the available spaces

2. Accessing the Workspace
- Click on the space where you want to add tags.
- Click on 'Workspace'

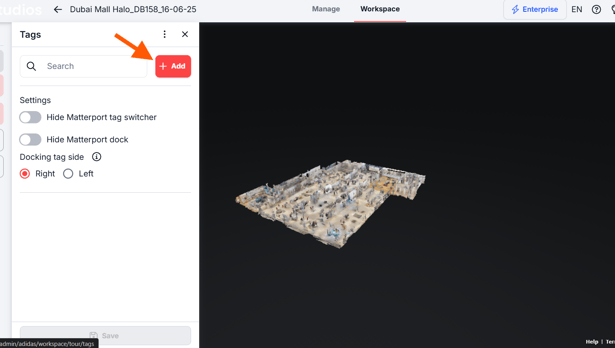
3. Adding Tags
- Click on Digital Twin and then "Tags"

- Click on the 'Add' button to place tags in the virtual space.
- Drag and drop the tag pin anywhere in the virtual tour.

- Once placed, name the tag:

- Title: Enable this toggle. A tag title helps differentiate between tags.
- Description: You can add a detailed description (up to 2000 characters) with text formatting options.
4. Tag Action Types – Media
- To add a media to the tag, upload images or videos in formats: JPG, PNG, WEBP, MP4. PDFs are also accepted.

- Add a single file or multiple files to create a gallery (max 10 files, 5MB each).
- Alternatively, add video links (GIF, YouTube, Vimeo) for single or gallery media display.
5. Customizing Tag Appearance
In the Appearance section, you can:
- Choose an Icon: Select from default icons or upload your own.

- Set Colors: Customize the icon and background colors.
- Adjust Opacity: Make the tag more or less transparent.
- Toggle Stem Visibility: Adjust the stem height of the tag

6. Tag Settings
- While creating the new tag, you will see the Eye and Navigation icons in the tags settings.
-
Eye icon means that you opened the tags General settings.

-
If you have already created a tag and want to change the position , just click on the Navigation icon to change the tag's position using the arrows . If you start moving the tag but change your mind, click the Eye icon above to close the arrows.

7. Deleting Tags
To delete a tag created in the space, click the tag to open settings, then click the Delete button.

📞 Support
If you have any issues or questions, please reach out via Live Chat or email us at admin@liminastudios.com